Monday, February 14, 2011

Antique Lace, Pleats and Feather Stitches

This is my grandson Zachary's christening gown.


Forget the he's nearly six feet tall now, his voice is changing and his life's ambition at this point is to be a champion skate boarder, I still see that round, newly-minted baby face and the chubby waving arms and legs.
He was nearly too big for the gown.


The gown is all made by hand. It's made of Swiss batiste. It goes without saying that the batiste you use must be the best you can find. Why waste your time and effort on materials that are inferior?


I didn't have a pattern. But I had made a lot of wearable art garments based on ancient clothing patterns and began the gown with the yolk and neck and back piece. I started with the front placket. The collar arrangement, number of pin-tucks, insertions of lace and the kind of embroidery to use were the first decisions to make.


I have a large stash of antique lace that I was just itching to use. Some I had collected in England and some I found a whole shoebox full at a garage sale in Portland OR years ago. The large, wide band overlay at the bottom of the gown was bought from a fabric suppler and is modern. (Of course, the best, softest must be put on the neckband.) The gown opens in the back with a simple placket and button closure.


On this gown, the front and back the same. There is no shoulder seam. The embroidery, inserts, and tucks all continue over the shoulder to the back placket. I pulled the threads for all the pin-tucks, pinned them down securely, decided on the lace inserts and entredeux.

All the embroidery is done in white thread using the feather stitch.

The same pattern is repeated down the body of the dress and at the sleeves. I used ribbon insertion lace at the sleeves and on the front and back yolks so I could insert trailing ribbons. The only break in the design is the use of a very wide and intricate band of white lace overlay at the bottom of the dress.

This conceals an area on the inside where the name of the baby and the date of the christening can be embroidered in white thread. I hope the dress will be used by many babies and their names will be added to the list.


Maybe his first child will the the next name.

Wednesday, February 9, 2011

Some to do with Fiber; Lots to do with Jewelry

For the last few days, I've been going around to parts of the Tucson Gem and Mineral Shows. It is the largest event of this kind in the country. And boy, do I believe it.

Not only are there literally acres of beads, pearls, and jewelry components, including lots of interesting ways to use buttons (see, it's sorta fiber related) but minerals, fossils, tools of all kinds for jewelry and stone work. Retail and wholesale venues with dealers are in locations mostly centered around the freeway in motels and hotels and exhibition halls. Or they are in villages of massive tents arrayed in open fields. There's even one place where people drive their motor homes into a big area and show their wares.

Along with the main focus of the shows, there are importers of silks, antique textiles, oriental carpets, art-to-wear clothing booths, just acres and acres of stuff. Glorious stuff.

I've tried to limit my scope to beads and tools. But it's hard. There is so much bling by the square foot it's overwhelming. Take a look at my other blog, www.jeanetteharrisblog.blogspot.com for the full effect.


Can I figure out a way to make buttons out of stone donuts?

Wednesday, February 2, 2011

Fabrics

Ah, fabrics. Everyone needs a fabric stash.


A quilt group friend of mind decided to sort through and thin out her fabric stash. She had years of yardage and, bless her, when she bought it, she bought lots of it. I've heard horror stories of people who pieced quilts and ran short on a vital pattern or color.

It was a bonanza for me because our fabrics were roughly of the same vintage or at least relative dye lots. So they fit right in with my color selections. And, I might add, of comparable quality to the cotton I already had.

Something horrible has happened to the cloth supply. None of it is being made in this country anymore, I don't think, and what comes in is loosely woven, inferior thread. If I'm going to invest time and energy into a quilt, I certainly want to use the best materials I can find. I hope the outlook improves in the future.


I went home from the sale with armloads of cloth. Her husband helped me load my car, there was so much. So now, I have outgrown the antique armoire that my stash was in. I've had to resort to plastic storage boxes sorted by color. Not the best solution because I can's see them easily and have to haul the boxes out and unload them to look at everything.


The shelving solution pictured above would be nice. Someone needs to build an elegant piece of furniture with glass doors, good lighting and adjustable shelves to serve as a stash-holder.

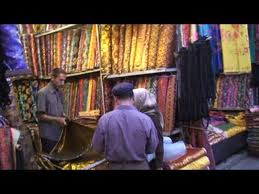
I remember the cloth bazaar in Bahrain, much like the photo. It was a winding street several blocks long with open shops loaded with cloth of all kinds and colors. Fabrics from India, Japan, Africa, Britain. Wonderful colors and patterns. Simply mind-boggeling.


Friday, January 28, 2011

Spool Holder

This was posted earlier on my clay blog: www.jeanetteharrisblog.blogspot.com.
And I thought it might be of interest to sewers too.


Sometimes, a problem can be solved using a clay design.

On occasion, I do quilting and it seems I was always reaching for the large white thread spool. It never seemed to be in a convenient place.

So, I designed this thread holder. Now, I can reel of mass quantities of thread when needed with very little fuss or searching.

Just made of a slabbed stoneware, I cut out a paper pattern first. The piece is a bit longer than the spool plus the length of the front and back which are bent up, slots are cut with a fettling knife and smoothed out in both ends. This makes for easy removal and replacement of the spool and spindle.

Add a springy piece of bamboo (a skewer will do if the pointy end is cut off) to hold the spool.

The holder keeps the thread in one place, like on a table top within easy reach. It makes it easy to recharge your needle and doesn't look too bad just sitting there.

Now if I could just figure out how to mount a pair of scissors...........Better yet, an Exacto blade glued into a pre-made slot offset somewhere on the side for a thread cutter.

Next time!

Monday, January 24, 2011

Wedding Ring Pillow

This Wedding Ring Pillow looks complicated, but it really isn't.

No special needle skills needed outside of basic embroidery and hand sewing.

The materials are a good bleached batiste, satin ribbon, manufactured rosebuds, some lace, in this case, out of my antique hoard, and a touch of some gold mylar cording I found on sale by the spool.

The real secret here is the rings. They're not rings at all, but plain earring hoops with the earlobe fasteners hidden under the rosebud and ribbon.

And the touch of color under the lace border is a wider purple ribbon laid down and stitched under the trim lace.

On the reverse, I added a strap for little hands to hold onto.

It's nice to make these in a way that the pillow filling can be slipped out and the flat pillow can be put in a shadow box and framed.

Thursday, January 20, 2011

Lost Ships


I love scrappy quilts.

This one has a lot of clothing scraps in it. Blue is by far my favorite color, so I always have a large amount of it in large and small amounts.

One fabric in particular was a white background with little cobalt blue sailing ships printed on it. It came from a little shirt I made my son when he was a preschooler. ( I made all his shirts until he went to school.)

The intriguing thing about making scrap quilts is the huge amount of mixture you can get in the small half squares. This was before I learned how to make the quick-sew half squares. It's very time consuming cutting out individual triangles and sewing them together.

Here's how to make them the fast way.

Go to: http://www.patchwork-and-quilting.com/calculating-half-square-triangles.html and follow the page instructions on how to measure and sew a big bunch of these little darlings. Click the link on "Grid Pieced Method" to see how to sew and cut them en mass.

Good stuff on this site.

This method is much quicker, easier and less hassle than doing the squares individually.

Monday, January 17, 2011

Paper - The Other Fiber


I love paper; especially beautiful paper.

I love boxes too. I love making custom boxes.

This is another class I took some time ago. I learned how to make boxes from scratch. Using a grey board, I learned to construct boxes that were sturdy outside and had tight-fitting drawers and custom compartments.

It's a lot like carpentry.

This little treasure is a carved elephant and rider I bought when we visited New Dehli in the '70s. It is such a delicate carving. (The elephant has separate, swingy earrings.) It is only about 1 1/2 inches tall and I've always been afraid it would get damaged. So, I made this keeper box based on a classic perfume box design.

I even cut custom recesses in the bottom black mounting piece to fit the outline of the elephant's feet. They fit down into holes that are about 1/8 inch deep. He is kept in with tiny dollops of Museum Gel.


On the top of the box is an antique ivory teapot knob I found in an antique store; the little dangling elephant is a family piece--an antique celluloid political token from about 1880-1900.

The paper covering the box is made in India.

I have many sketches and notes on boxes in my clay files. The same principles of construction apply, with modifications for working in clay. Lana Wilson has written several good articles about how to make clay boxes.

I'm particularly interested in figuring out how to make a box with a secret compartment. I've always loved the idea of hidden rooms, sliding panels, puzzle boxes.