Showing posts with label Antiques. Show all posts

Sunday, May 3, 2015

Loom for Sale


This is an antique Rocker-Beater loom.

It dates from around 1850--maybe even earlier.

The wood is hand hewn yellow pine and probably came from the southern areas of the east coast.

I found it in Missouri in the late 1960's. It had been in an old mill before that.

I wove many a rag rug on this beautiful thing. And made a few tapestries as well.

You can seed why it is called a Rocker/Beater loom. The beater bar swings on this rocking chair type arm. The bottom is attached to the frame of the loom by way of a thin-cut flexible piece of wood which is attached to the frame on one end and to the rocker at the other end.

The dog is all hand-cut from wood and works well.

The only metal on this loom is a late-applied ring someone added at a later date to stabilize another dog.


All the heddles were hand-tied cotton string. There are small holes on the large side pieces where nail can be inserted as a guide to tiring new heddles. There are no heddles on the loom at the present, but they are easy to make and attach.

Also, the pegging in the warp beam have been removed.

This loom is for sale. If you are interested in buying it, please contact me via the comments section of this blog.

For a detailed story of how I found the loom, go to the index at the side of the blog and select "Looms".


I live in western Washington state in the U.S. Shipping would have to be arranged and paid for by the buyer.

For more information about historic looms, go to http://www.ohio.edu/people/deanr/rockerbeater/loomalbum.html.


Monday, April 27, 2015

TV and Web Discovery


I stumbled upon a program on cable about a business in Los Angeles called, The Way We Wore.

What a treasure for the fabric addicted!

The collection is amazing.


The website is
just as fascinating as is the blog:

http://thewaywewore.com/blogs/blog.


Think I'll go rifle through my stash and see what they might buy.  The buy too!

Tuesday, January 8, 2013

Sometimes, It is good to be a hoarder


Necklace componants:


Mother of pearl antique belt buckle.

Mother of pearl beads, buttons.

Agate beads.

Faux pearls

Real pearls

Glass beads

Seed pods

Wooden beads

Coconut shell beads and buttons

Shell beads

Brass beads and tiny brass bell

Moon stone beads

And for spice: Black onyx and glass beads

Thursday, January 3, 2013

What to do, What to do?

The antique kimono material on my sofa pillow is falling to pieces.    

That is to say, the Mon or Japanese family crest symbol, is deteriorating.

And I'm in a quandary as to what to do.  Do I sew a backing onto the underside to stabilize it and let it continue to deteriorate? Or do I put a backing on and embroider the surrounding fabric? Maybe I should put a contrasting color behind the Mon and let it lose threads creating a whole new process and design?

Or maybe I should locate some other fabric or motif and applique it over the Mon, creating an entirely new design?

The whole pillow is black and white.

I really don't want to trash it; I love the feel of ancient silk.

P.S.  I forgot to mention, the bottom of the Mon is down to horizontal threads in the lower 1/3; the top of the circle is totally coming unfastened and can be lifted up.


Any ideas?

Sunday, September 30, 2012

Antique Embroidery Hoop


This is a lovely thing.

So very simple. A well-made hoop, heavy enough in construction to not need fabric binding or alteration to make it fit snugly.

It's amazing that, at it's age, it is still kept it's 'round'.

Because wood shrinks at different rates horizontally and vertically, i.e. with and across the grain, whoever made this understood their material well. It is probably made of "Box" or Linden wood, possibly Scandinavian in origin.

There is absolutely no metal involved. A handmade wood screw still holds the hoop securely to the table top.

The attaching piece allows the hoop to rotate out from the clamp for ease of use.


An absolute pleasure to use.

Friday, September 28, 2012

Addendum

Yee Gods!

I was looking up something else, as always on the computer, and ran across a listing for a clamp pin cushion very like the little one I mentioned in the previous post.

It was for sale at nearly $500.00!

I guess I had better lock it in the safe.  heh

Who would believe such a little tool some husband/father probably made would be worth so much?


Thursday, September 6, 2012

Clamp Pincushion


Isn't this the neatest thing?

I picked this little pincushion/clamp up at an antique store somewhere in Missouri.

It may have been made by the Amish, but it may be something brought from the East Coast and much older. It looks very New England. Maybe dating from the late 1700's - early 1800's?

Somebody made this little jewel. The whole thing is such a pleasing thing to have around.

The wooden clamp was probably turned on a lathe.

The screw is wooden too. I think there was a tool with a small metal bit in it to cut wooden screw threads. I believe I've seen one somewhere. Maybe even in my father's wood shop years and years ago.


What a nice little tweeky knob at the end. Exactly right for finger-tightening.

I keep the wood screw working smoothly with a little beeswax now and then. It seems to be the right thing to use on it.


And it is such a lovely, burnished black finish that only comes from being touched many times by hands.


The fabric on the top is woven; maybe handwoven by some woman. Simple white and blue plad with an overshot zig-zaggy variation pattern....The threads are even but course. I haven't disturbed it and probably never will. There might be other fabric below the top cover. It is sewn on tightly with two kinds of coarse thread.


The stuffing is coarse and springy black and white horsehair. The plow horse's mane? The favorite riding horse's tail strands? A forelock clipped and wound around a finger?

Beneath the stuffing is a small mushroom-shaped, slightly domed small knob.


The clamp has a firm bite to any table edge.

Sewing table?

Quilt frame?


If only it could talk.


Click the photos for a more detailed view.


Saturday, July 28, 2012

Pincushions


I love pin cushions.
Here are three really neat ones......


The green heart is one I made using my shisha skills.


The second one (which seems to have cast off it's pompom, is one I bought somewhere.
I think it's a Hmong piece.


And the third one, I picked up somewhere.  
It looks like an Icelandic or Saami people shoe. 

I was thinking about putting it on a chatelaine, but it's just too cute to use. 

Tuesday, May 1, 2012

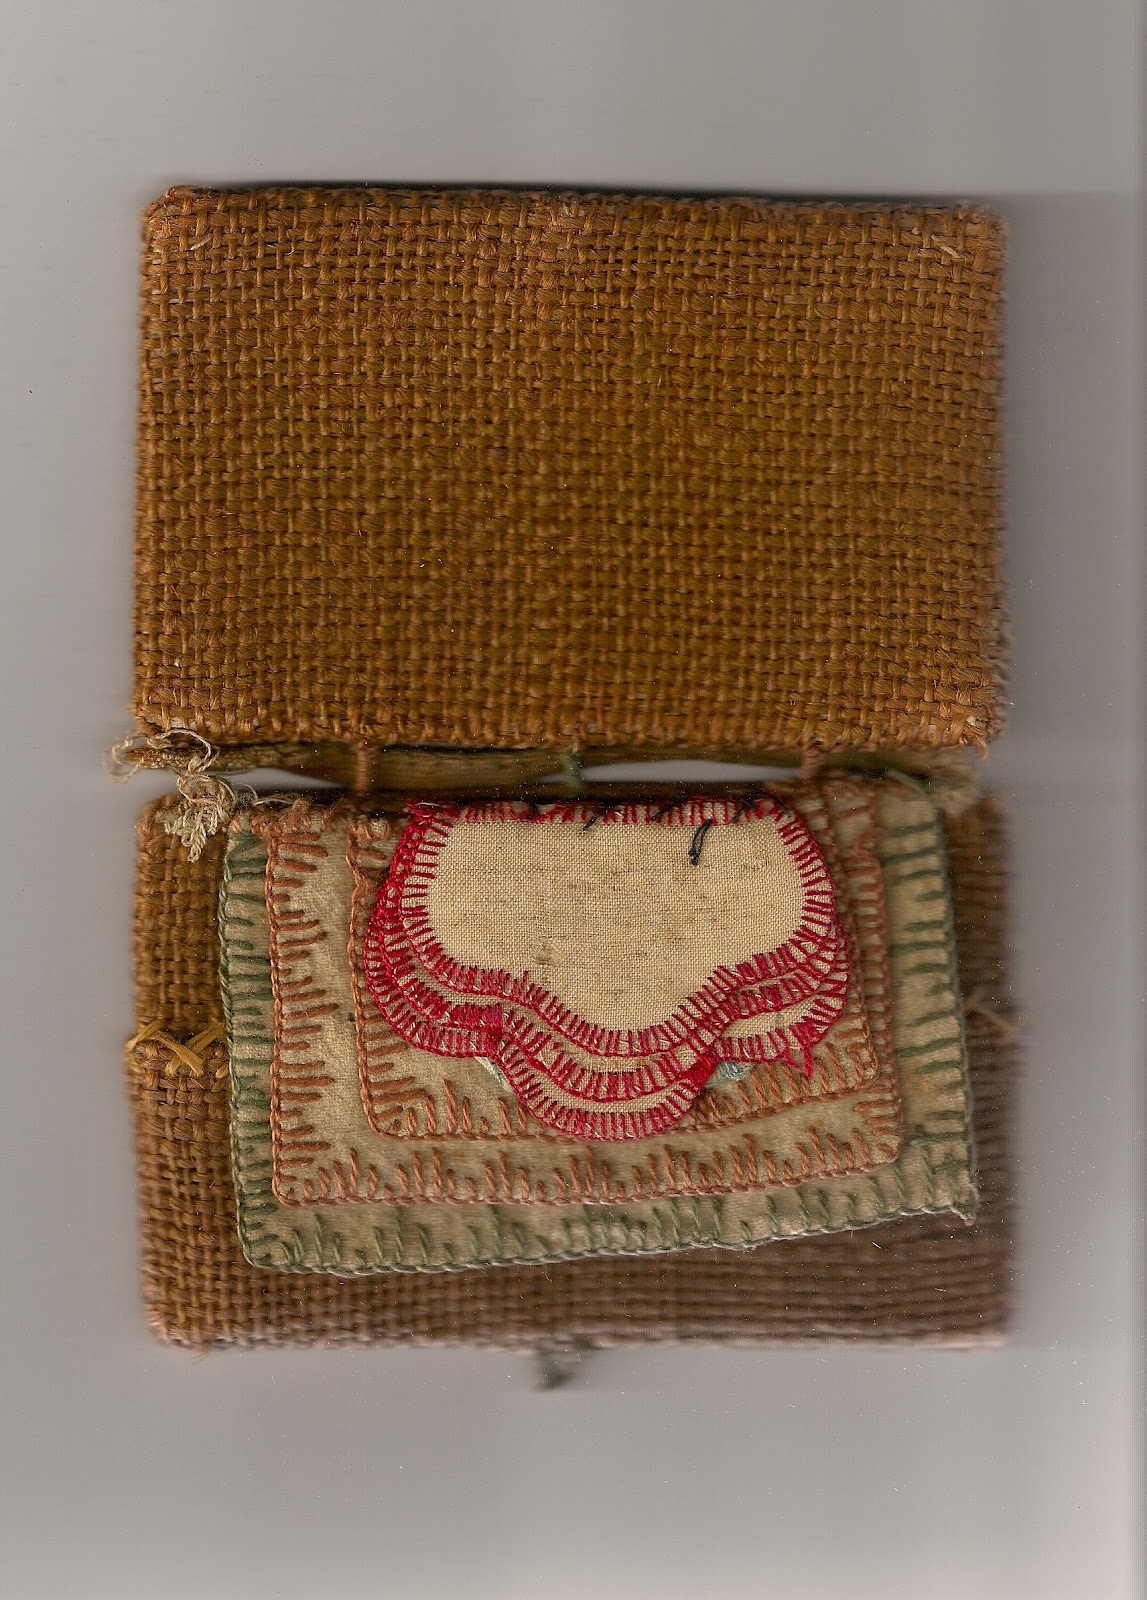
While digging in some boxes of family stuff stored away, I came across this little needle case.

I wish I knew who in my husband's family made it. It could have been the Swedish grandmother, the German needlewoman, the English great-grandmother or someone further back in time. I know it had to have been a few generations back judging from the outer fabric.

And on examining it further, I decided it was made not by a mature woman, but a child.

I would love to know what the inside stiffening material is. I have a feeling it is not cardboard but very thin wood.

Too bad the fastening button is gone; that would have been a big clue. It was very small whatever it was.

The needle case is only about 2 inches by 4 inches. And the strap on the spine is a unique feature--as if it was pinned to an apron or a dress. Maybe it hung from a chatelaine.


Can anyone tell me about the fabric?  I'm sure it was much brighter when new. The rusty brown weave is overshot and still has a shine. Silk, maybe?

Friday, April 29, 2011

Antique Wedding Crown


When I was about 8 or 10 years old, I discovered this silver plate tiara in an old store.

It was a store my family owned and there was an office/balcony area with old storage shelves that were no longer used. I was there with my dad and he was working on the receipts for the day at a desk after the store was closed.

I, being bored, went exploring, looking around in an area that no one ever went into. I saw something shiny in the back corner of a shelving unit.


I fished it out and took it to show my Dad. It was pretty tarnished; almost black. "Where did you find that?" Dad asked. He had never seen it before and had no idea it had been there for who knows how long.

I took it home, polished it up and found a patent pending date of 1880 engraved on the inside. I used to play dress-up with it. And somewhere along the way, broke it into two pieces.

Many years later, I found a jeweler who could solder it back together.

I put it away and didn't give it much thought after that. I even forgot about it when my own wedding happened.

But I remembered it again and made a very special crown for someone I love very much. I made the background for the veil and sewed the crown onto it. It isn't exactly perfect, owning to the mend, but it looked stunning on the day.


Especially for someone who shares a common ancestor with Princess Diana: Sir Hugh Despencer the Elder. The name was later shortened to Spencer.

Thursday, April 28, 2011

Beautiful Indigo


Just look at this wonderful jacket.

I have a real weakness for indigo. I don't think there has been a time that I didn't own a denim shirt, jacket, coat--something.

At one time, I had a Mao jacket, but I haven't a clue what happened to it.

This garment is so simple; it wouldn't be hard to make your own pattern just by your own measurements. There are no darts, gussets, difficult stuff. Just figure out how the overlap would work and you're home and dry.

I think I would change the width of the bottom to a less flared shape and definitely add at least one pocket.

Can't ever have enough pockets. That's one of the reasons why I buy men's T-shirts. They have pockets. And they are made better than women's, generally.


Monday, March 28, 2011

Pillow Slip

At first glance, where would you say this pillow cover came from?


The Southwest?

It's an Art Deco reproduction from a trendy store?

Nope.


It is a vintage Japanese pillow cover.


When I bid and won it on Ebay, I was surprised to find when it arrived that the original tag was still stuck to the fabric.

And it was in Kanji. I recognized the type face as ca. the 1910-1930's.

The fabric is silk challis. Even the snaps on the backing are authentic to the period.

It's probably from the Taisho Period in Japan. This period followed the reign of Emperor Meiji when the influence of Victorian western culture made huge inroads into the Japanese culture.

The Taisho Period saw the advent of motor cars, modern conveniences and the flapper era.


I actually saw this screen in Honolulu. It is nearly life-sized and absolutely stunning.

Design-wise this little pillow cover fits right in there.

The photo does not do the dye colors justice.

As a matter of fact, I have decided to take the cover off my grandmother's feather pillow (The inside is covered with now-fashionable blue-striped ticking) and find a shadow box frame in order to hang it on the wall.

Friday, March 25, 2011

Another Ring Pillow

This ring pillow was made of white batiste with antique lace, transparent sequins and white and gold thread embroidery.


The ring is really a plain, gold-washed band tacked down to the pillow. Symbolic only. The white ribbon is also lightly tacked in strategic places to keep the look of the bow.


The lace was so beautiful, I only wanted to highlight the shape of the design, so sequins were applied just lightly.


The gold thread is true gold, not Mylar. I took a gold-work class at one time and it came in handy when I wanted to make something super special.


The whole pillow is made to lie flat when the stuffing is removed. That way, it can be placed in a frame, with a little offsetting to allow the ribbons to stay three dimensional. Makes a nice bride's keepsake.


Click on the images for a close-up view.

Monday, February 14, 2011

Antique Lace, Pleats and Feather Stitches

This is my grandson Zachary's christening gown.


Forget the he's nearly six feet tall now, his voice is changing and his life's ambition at this point is to be a champion skate boarder, I still see that round, newly-minted baby face and the chubby waving arms and legs.
He was nearly too big for the gown.


The gown is all made by hand. It's made of Swiss batiste. It goes without saying that the batiste you use must be the best you can find. Why waste your time and effort on materials that are inferior?


I didn't have a pattern. But I had made a lot of wearable art garments based on ancient clothing patterns and began the gown with the yolk and neck and back piece. I started with the front placket. The collar arrangement, number of pin-tucks, insertions of lace and the kind of embroidery to use were the first decisions to make.


I have a large stash of antique lace that I was just itching to use. Some I had collected in England and some I found a whole shoebox full at a garage sale in Portland OR years ago. The large, wide band overlay at the bottom of the gown was bought from a fabric suppler and is modern. (Of course, the best, softest must be put on the neckband.) The gown opens in the back with a simple placket and button closure.


On this gown, the front and back the same. There is no shoulder seam. The embroidery, inserts, and tucks all continue over the shoulder to the back placket. I pulled the threads for all the pin-tucks, pinned them down securely, decided on the lace inserts and entredeux.

All the embroidery is done in white thread using the feather stitch.

The same pattern is repeated down the body of the dress and at the sleeves. I used ribbon insertion lace at the sleeves and on the front and back yolks so I could insert trailing ribbons. The only break in the design is the use of a very wide and intricate band of white lace overlay at the bottom of the dress.

This conceals an area on the inside where the name of the baby and the date of the christening can be embroidered in white thread. I hope the dress will be used by many babies and their names will be added to the list.


Maybe his first child will the the next name.

Monday, January 17, 2011

Paper - The Other Fiber


I love paper; especially beautiful paper.

I love boxes too. I love making custom boxes.

This is another class I took some time ago. I learned how to make boxes from scratch. Using a grey board, I learned to construct boxes that were sturdy outside and had tight-fitting drawers and custom compartments.

It's a lot like carpentry.

This little treasure is a carved elephant and rider I bought when we visited New Dehli in the '70s. It is such a delicate carving. (The elephant has separate, swingy earrings.) It is only about 1 1/2 inches tall and I've always been afraid it would get damaged. So, I made this keeper box based on a classic perfume box design.

I even cut custom recesses in the bottom black mounting piece to fit the outline of the elephant's feet. They fit down into holes that are about 1/8 inch deep. He is kept in with tiny dollops of Museum Gel.


On the top of the box is an antique ivory teapot knob I found in an antique store; the little dangling elephant is a family piece--an antique celluloid political token from about 1880-1900.

The paper covering the box is made in India.

I have many sketches and notes on boxes in my clay files. The same principles of construction apply, with modifications for working in clay. Lana Wilson has written several good articles about how to make clay boxes.

I'm particularly interested in figuring out how to make a box with a secret compartment. I've always loved the idea of hidden rooms, sliding panels, puzzle boxes.

Tuesday, November 30, 2010

Silk Sew Kit

Some time ago, I made this handy little sew kit to stick into a drawer, handy for quick fixes or mends.

It is quite small as you can see from the size of the embroidery scissors. (Beautiful little scissors, a gift from my daughter-in-law one Christmas.)

The outer fabric is a choice bit of special kimono silk done in the shibori style.

At first glance, it is hard to comprehend how complicated the fabric's construction and dye treatment is, but even after studying all this time, I'm not sure I understand all the process and tedium needed to produce it.

I can't imagine an entire kimono of this, but it must have been a stunner. The mind boggles at the work!

Perhaps it was just part of an obi, the sash that goes around a kimono.

The silk is very fine and soft; of the first quality.


It was first dyed in pastel pink and green background dyes.

Then, using fine thread and a fine needle, the maker made tiny tufts or peaks of fabric. These were spaced uniformly all over the piece so that the peaks stood up higher than the ground or background of the fabric.

Usually the next step is to plunge the whole thing in a dye bath that is of darker color than the sewn sections. Sewing tightly keeps the dye from getting to those parts and they usually remain lighter than the general background colors.

But in this case, the peaks are darker. The only conclusion I can come to is that each one of them was individually died with the light charcoal pigment, using an extremely fine brush.

I just can't imagine the hours it took.

Inside, there are two soft pockets for scissors, thread, a thimble, etc. The pockets are tacked at the center in order to keep things tucked inside them securely.

I had a couple of tiny antique celluloid buttons that worked perfectly here. One is round and the other is an oval.

The center fabric is kimono lining silk made with a faint woven pattern--Another choice piece.

The center pin cushion is stuffed tightly with polyester 'fluff' for pins on the sides and a needle or two at the center. It also acts as a spine for the kit.

Another antique celluloid button is used to close the kit with a satin loop. This one has subtle graining to look like ivory.


The inner lining (under the pockets) was sewn to the outer layer using two adjacent rows of hand stitches to secure the layers to each other and give the outside some structure and strength.

The satin binding and loop was made of a leftover piece from vest-like top I made for myself many years ago.
The top went with a formal full- length skirt of softer fabric.

I still have a few more scraps of this beautiful fabric.
The sewing kit measures about 8 inches by 5 inches and is all made by hand.

There is a softness to things put together by hand that is absent in machine-sewn things. You can coax the shape more easily and shape the fabric into a softer form.

I really should treat the whole thing with Scotch-Guard or something. Until now, I hadn't even thought of washing it, since it is hardly ever handled except to sew something. Will have to test a scrap to be sure the dyes won't run.....