Showing posts with label Tools. Show all posts

Sunday, September 30, 2012

Antique Embroidery Hoop


This is a lovely thing.

So very simple. A well-made hoop, heavy enough in construction to not need fabric binding or alteration to make it fit snugly.

It's amazing that, at it's age, it is still kept it's 'round'.

Because wood shrinks at different rates horizontally and vertically, i.e. with and across the grain, whoever made this understood their material well. It is probably made of "Box" or Linden wood, possibly Scandinavian in origin.

There is absolutely no metal involved. A handmade wood screw still holds the hoop securely to the table top.

The attaching piece allows the hoop to rotate out from the clamp for ease of use.


An absolute pleasure to use.

Thursday, September 6, 2012

Clamp Pincushion


Isn't this the neatest thing?

I picked this little pincushion/clamp up at an antique store somewhere in Missouri.

It may have been made by the Amish, but it may be something brought from the East Coast and much older. It looks very New England. Maybe dating from the late 1700's - early 1800's?

Somebody made this little jewel. The whole thing is such a pleasing thing to have around.

The wooden clamp was probably turned on a lathe.

The screw is wooden too. I think there was a tool with a small metal bit in it to cut wooden screw threads. I believe I've seen one somewhere. Maybe even in my father's wood shop years and years ago.


What a nice little tweeky knob at the end. Exactly right for finger-tightening.

I keep the wood screw working smoothly with a little beeswax now and then. It seems to be the right thing to use on it.


And it is such a lovely, burnished black finish that only comes from being touched many times by hands.


The fabric on the top is woven; maybe handwoven by some woman. Simple white and blue plad with an overshot zig-zaggy variation pattern....The threads are even but course. I haven't disturbed it and probably never will. There might be other fabric below the top cover. It is sewn on tightly with two kinds of coarse thread.


The stuffing is coarse and springy black and white horsehair. The plow horse's mane? The favorite riding horse's tail strands? A forelock clipped and wound around a finger?

Beneath the stuffing is a small mushroom-shaped, slightly domed small knob.


The clamp has a firm bite to any table edge.

Sewing table?

Quilt frame?


If only it could talk.


Click the photos for a more detailed view.


Friday, August 31, 2012

A Gift

One year my quilt guild exchanged Christmas gifts. The gift I received was this pincushion made by one of my friends who was a member.


She took a small basket, filled it with a styrofoam ball and added batting scraps to cushion it all the way around, then covered it with the cloth piece that looked old-fashioned.

She trimmed it with a heavy gold cord to finish the join between the fabric and the basket edge,

Then she trimmed the rim of the basket with a heavy braid to pick up the gold and repeat it.

The bow mirrors the cream of the trim and makes the whole thing look like an antique.

I would never dream of taking all these elements and putting them together.

Such a simple little thing, but the combination all together looks like a sweet heirloom.


Every time I use it, I think of her.

Thursday, August 16, 2012

Pear Pincushions

Once, I got a bunch of velvet sample pieces. They were too small to do much with them, but I kept them in a box with some other pieces of fabric.


I also had some scraps of felt and a bag of pure, white sand.

So I made pear pin cushions.

I didn't have a pattern. I just decided how big I wanted them and made a pattern of my own from a piece of paper.

The size of the pin cushions are about the size of a real pear. Except when I drew the pattern, I made the top elongated so that it would form a funnel for the sand.


I sewed the pieces up on the sewing machine, clipped the curves slightly.

I filled the pears with the white sand. I had to pound them on the table top to pack the sand in tightly. I wanted the pear to be jam-packed and really full.

I made the stems out of felt cut in a square with a leaf on top at one end. I rolled the square tightly to make the stem and hand-sewed it down.


I cut another leaf or two to be added to the stem. 


I held the stem in place while I pleated the tops of the pears, folded the fabric over and tucked it in to look like the top of a pear. Then I gathered it around the stem and sewed it all down tightly.


I really like having the sand inside the pincushion because it makes them stand up well and the sand polishes the pins every time they are pushed in and taken out.

Tuesday, May 1, 2012

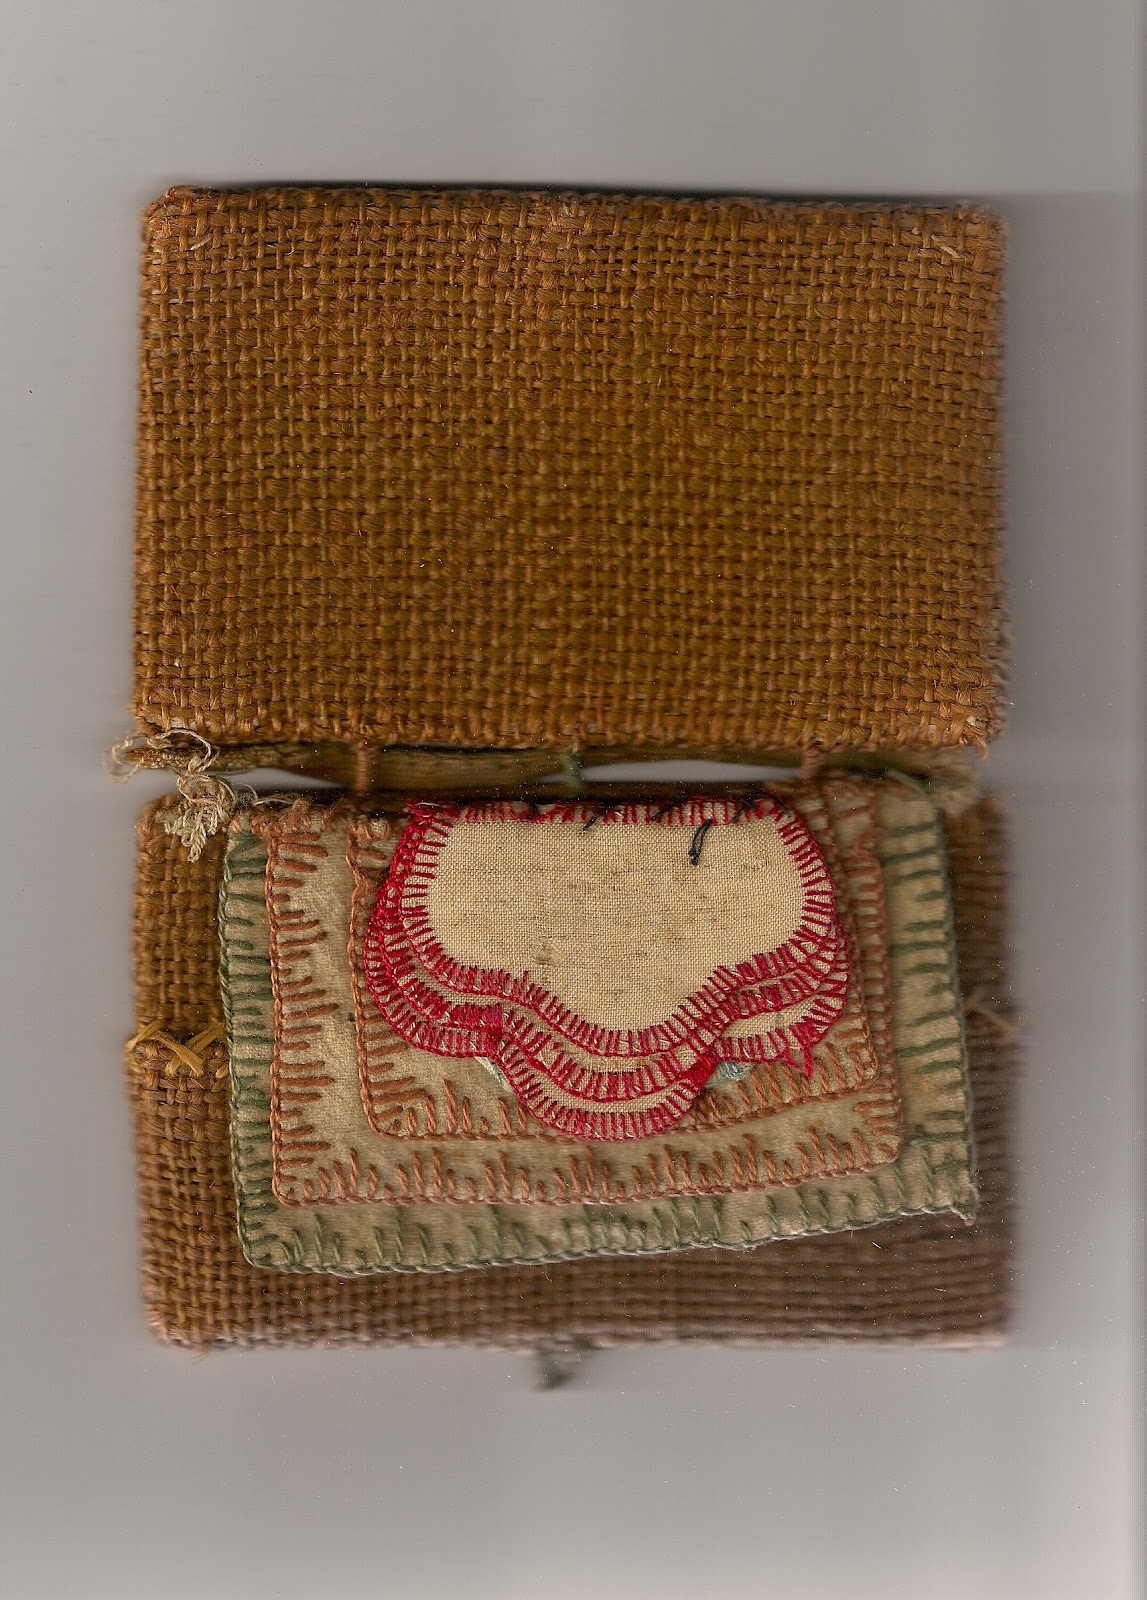
While digging in some boxes of family stuff stored away, I came across this little needle case.

I wish I knew who in my husband's family made it. It could have been the Swedish grandmother, the German needlewoman, the English great-grandmother or someone further back in time. I know it had to have been a few generations back judging from the outer fabric.

And on examining it further, I decided it was made not by a mature woman, but a child.

I would love to know what the inside stiffening material is. I have a feeling it is not cardboard but very thin wood.

Too bad the fastening button is gone; that would have been a big clue. It was very small whatever it was.

The needle case is only about 2 inches by 4 inches. And the strap on the spine is a unique feature--as if it was pinned to an apron or a dress. Maybe it hung from a chatelaine.


Can anyone tell me about the fabric?  I'm sure it was much brighter when new. The rusty brown weave is overshot and still has a shine. Silk, maybe?

Monday, September 19, 2011

Special NameTape


The logo mentioned in the previous post is one I have used for my art business.

I still use that metal dye to mark my artwork.

So when I began to make ethnic clothing some years ago, I ordered a custom "name tape" to sew inside as a label.

The company that made this tape is still in business and can be found on:

Friday, January 28, 2011

Spool Holder

This was posted earlier on my clay blog: www.jeanetteharrisblog.blogspot.com.
And I thought it might be of interest to sewers too.


Sometimes, a problem can be solved using a clay design.

On occasion, I do quilting and it seems I was always reaching for the large white thread spool. It never seemed to be in a convenient place.

So, I designed this thread holder. Now, I can reel of mass quantities of thread when needed with very little fuss or searching.

Just made of a slabbed stoneware, I cut out a paper pattern first. The piece is a bit longer than the spool plus the length of the front and back which are bent up, slots are cut with a fettling knife and smoothed out in both ends. This makes for easy removal and replacement of the spool and spindle.

Add a springy piece of bamboo (a skewer will do if the pointy end is cut off) to hold the spool.

The holder keeps the thread in one place, like on a table top within easy reach. It makes it easy to recharge your needle and doesn't look too bad just sitting there.

Now if I could just figure out how to mount a pair of scissors...........Better yet, an Exacto blade glued into a pre-made slot offset somewhere on the side for a thread cutter.

Next time!